
Import data from a formatted worksheet into Auctria and export data out of Auctria as an Excel worksheet.
In this guide:
Import Data (Video)
Import Data
Auctria allows you to import data from Excel spreadsheets, CSV files, and Google Sheets into various tables such as Participants (Bidders), Items, Donors, and Expenses.
Click Import on the left sidebar under Details.
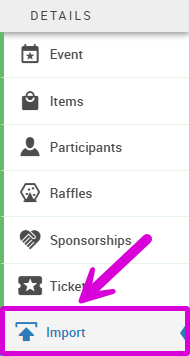
The Import button on the left Auctria sidebar.
Supported File Formats
- Excel (.XLS, .XLSX)
- CSV files
- Google Sheets
Before You Import
Prepare Your Spreadsheet
- View available fields for any table by opening the table (such as All Participants, All Items, All Donors, or All Expenses) and clicking the Columns button. You can highlight, copy and paste these field names directly into your spreadsheet column headers from the Choose Visible Columns window that pops up.

The Columns button on the Participants table.
- Name your columns to match Auctria field names when possible. This makes the mapping process easier and allows for automatic field matching.

Auctria will map the column headers of your worksheet.
Include a header row with your column names in the first row of your spreadsheet.
Organize your data starting in the second row (below your headers).
Tips for Better Imports
- Use consistent naming between your spreadsheet columns and Auctria fields
- For fields with multiple versions (like phone numbers), differentiate them clearly (e.g., "Phone" vs "Cell Phone")
- If you don't define certain values (like bidder numbers), Auctria will auto-assign them
Import Process
Accessing the Import Feature
On the Import page, you will see multiple options:
- Import (Current) - Upload a spreadsheet to add new records or modify existing ones using an older UI
- Import (Preview) - New UI that helps you set up your mapping more easily
- Import & Merge (Advanced) - Update specific fields and manually align data with existing records
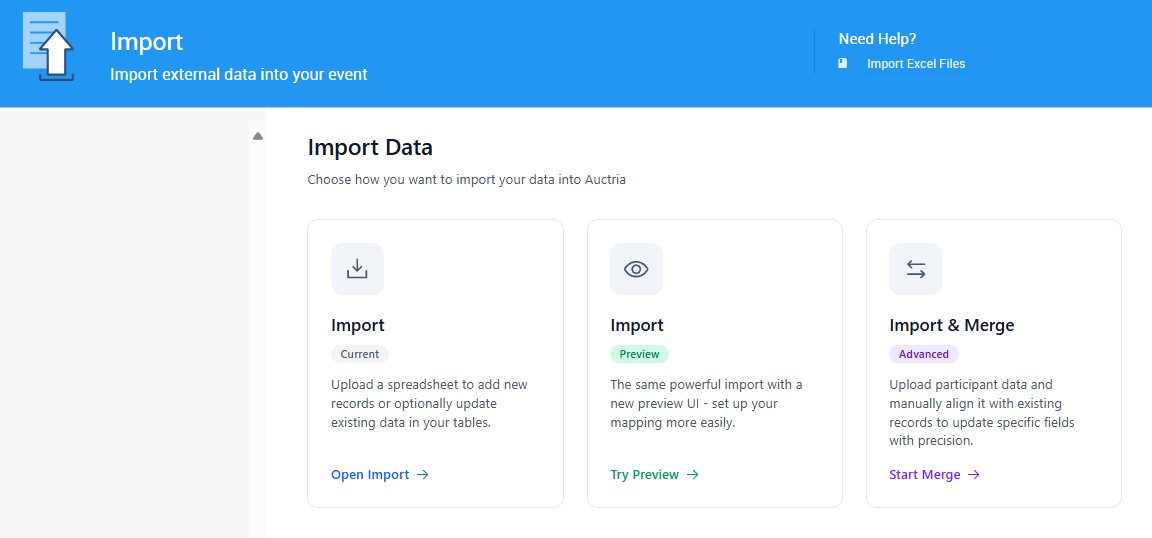
The Import page in Auctria.
Choose the version you prefer to work with.
Using the New Import UI (Preview)
Recommended
Step 1: Get Started
- Click the Import (Preview) tile
- Review the instructions and import tips
- Click Get Started at the bottom right
Step 2: Select Table and Upload File
- Choose the table you want to import data to (e.g., Participants, Items, Donors)
- Select whether you're uploading a file or using a Google Sheet
- Drag and drop your file or click to choose it from your computer, or enter the public sharing link for your Google sheet.
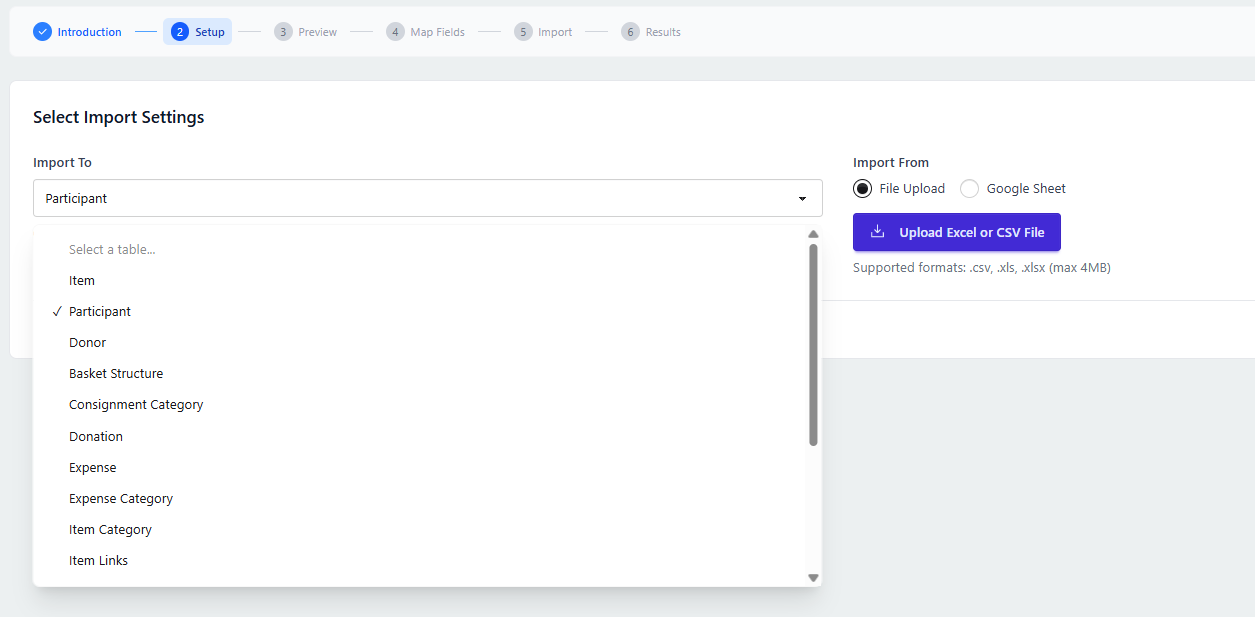
An example from a demonstration event.
Google Sheets - Public Sharing
Your Google Sheet must be set up for public sharing in order to be used for Import.
Step 3: Preview Your Data
- Review the data preview to ensure it looks correct
- Select the first data row - Choose the row number where your actual data begins (this should NOT be your header row; typically row 2)
- Click Continue to Field Mapping on the bottom right
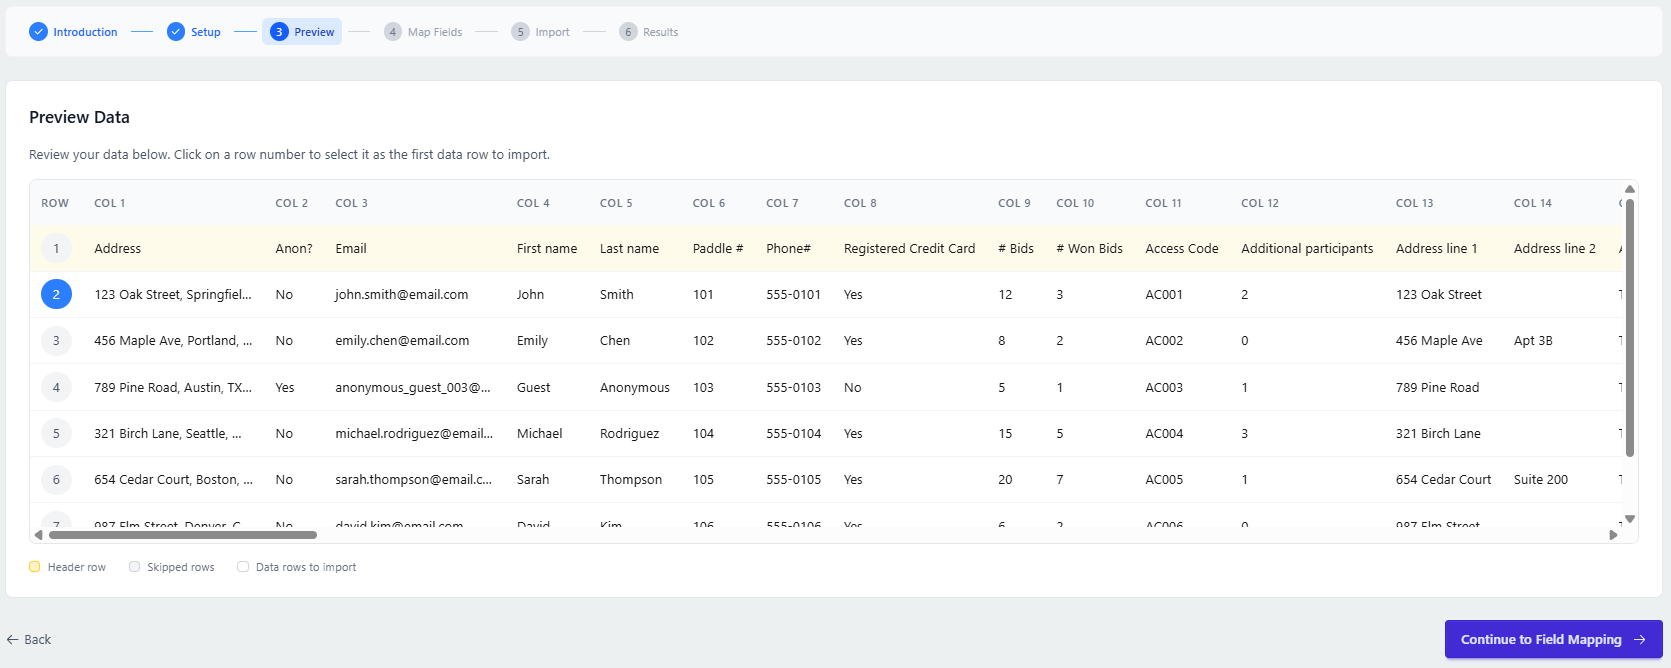
An example from a demonstration event.
Step 4: Map Your Fields
The Field Mapping screen shows your spreadsheet columns on the left and available Auctria fields on the right.
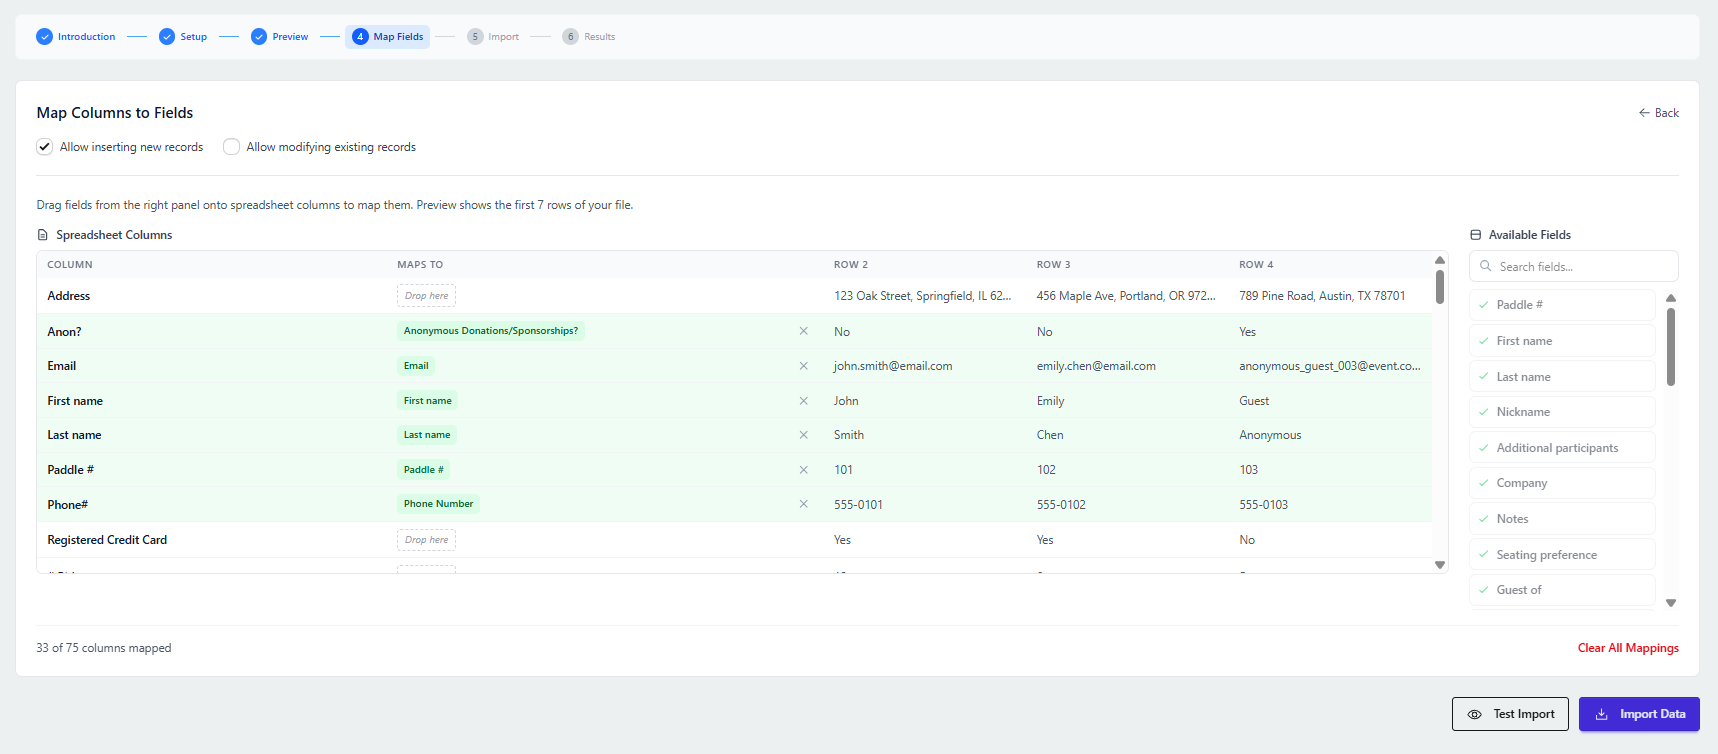
An example from a demonstration event.
Automatic Mapping:
- Auctria automatically maps fields based on your column names
Manual Mapping:
- Drag a field from the Available Fields list on the right
- Drop it into the Maps To column next to the corresponding spreadsheet column on the left
Import Settings:
Use the checkboxes at the top to control:
- Whether to insert new rows
- Whether to modify existing data
Step 5: Test Your Import (Recommended)
- Click Test Import at the bottom of the page to preview changes without making any modifications
- Review the summary to see what records will be affected
- Check for any errors or warnings
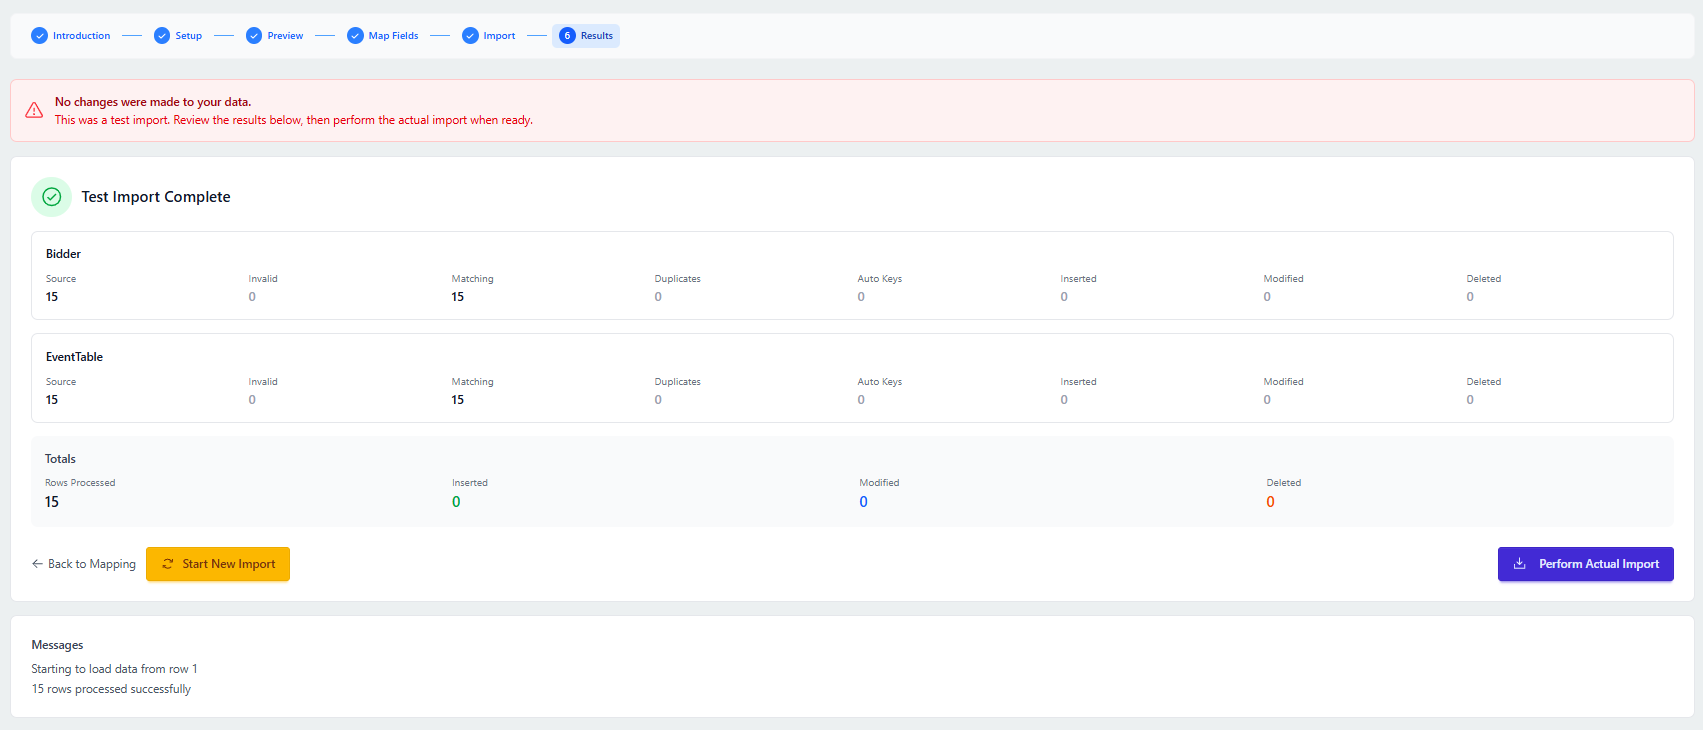
An example from a demonstration event.
Test Import
We recommend running a test import first. No changes are made during a test import.
If changes are necessary after reviewing the test results, click Back to Import. If the test import looks good, proceed with the actual import.
Step 6: Perform the Import
- Click Perform Import or Perform Actual Import to complete the process
- Review the confirmation page, which shows:
- Which tables were modified
- Number of records inserted or updated
- Any matching, duplicate, or invalid records
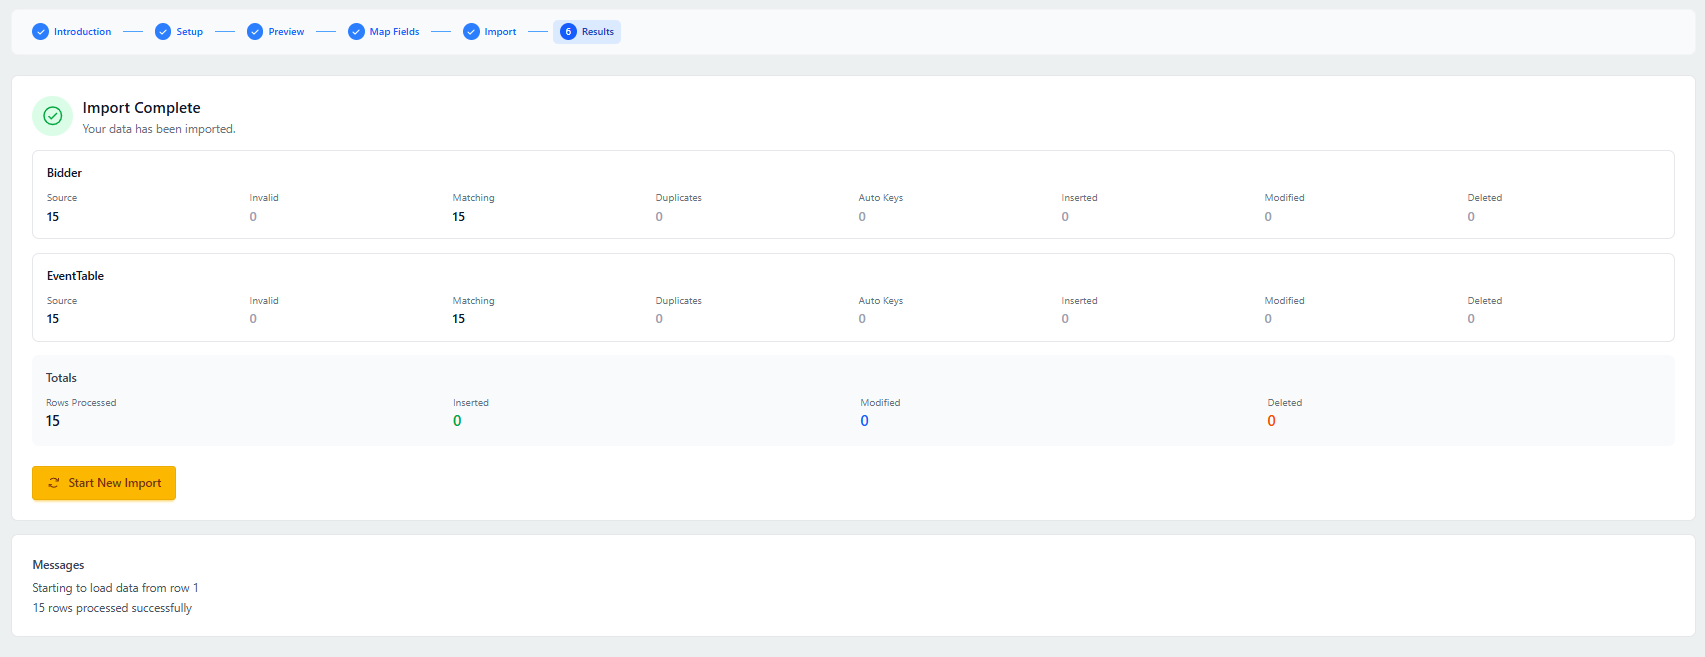
An example from a demonstration event.
Using the Current Import UI
Legacy Feature
Step 1: Access Import and Select Table
- Click the Import (Current) tile
- From the Select Table drop-down selector, choose the table into which you want to import your data
- Choose the file source you will use in the Select Source section
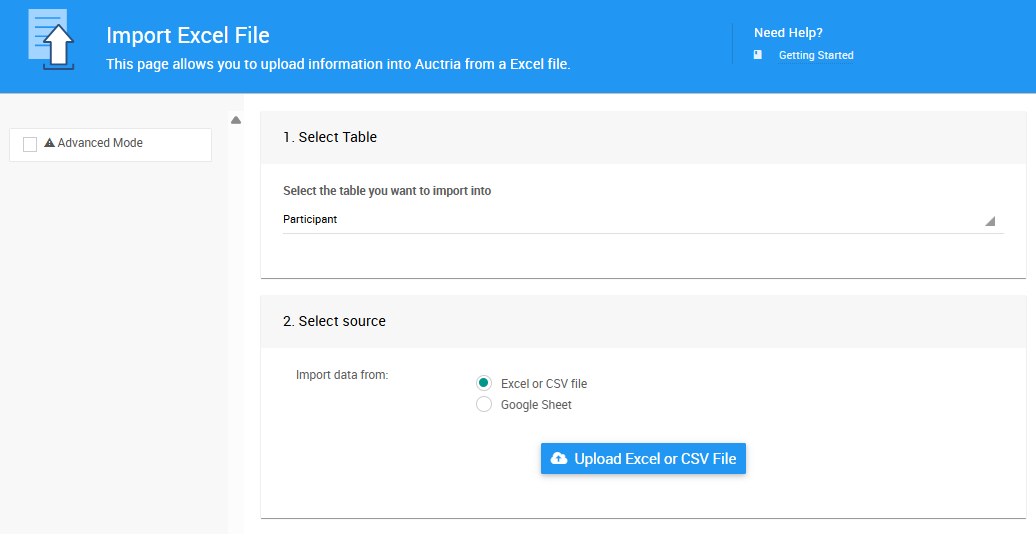
An example from a demonstration event.
Step 2: Upload Your File
- Click the Upload Excel or CSV File button
- This will trigger the Choose File popup window
- Either drag your XLS or CSV formatted file onto the window, or click Choose File to open a browser file picker to find the file on your computer
Auctria will display the data from your file in the Import Excel File window.
Step 3: Map Your Fields
You'll see a preview of your data with dropdown menus at the top of each column.
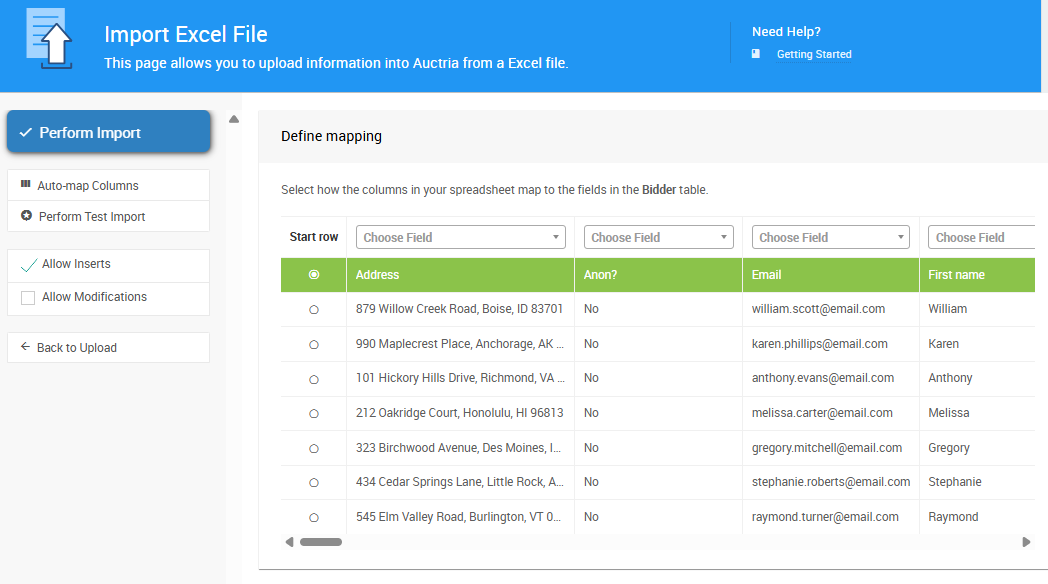
An example from a demonstration event.
Automatic Mapping:
- Click the Auto-map columns button on the left side of the Import Excel File page
- If your spreadsheet columns match Auctria field names, the dropdowns will automatically populate
- Adjust individual columns as necessary
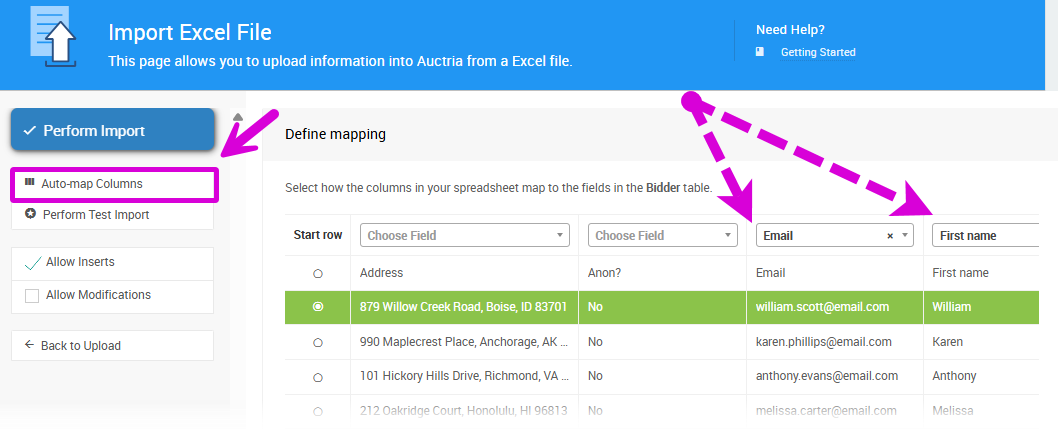
An example from a demonstration event.
Manual Mapping:
- Use the dropdown menu at the top of each column to select the corresponding Auctria field
- Use the horizontal scroll bar at the bottom if you have many columns to view all fields
Select Data Start Row:
- If you have a header row, select the row where your actual data begins (typically row 2) to omit the header from import
Import Settings:
Use the checkboxes on the side to control:
- Whether to allow new rows to be inserted (Allow Inserts)
- Whether to modify existing data (Allow Modifications)
Step 4: Run a Test Import (Recommended)
- Click Perform Test Import on the left side of the page (under Auto-map columns)
- Review the summary showing:
- Total number of records that will be modified by table
- Any records that could not be imported
- No changes are made during a test import
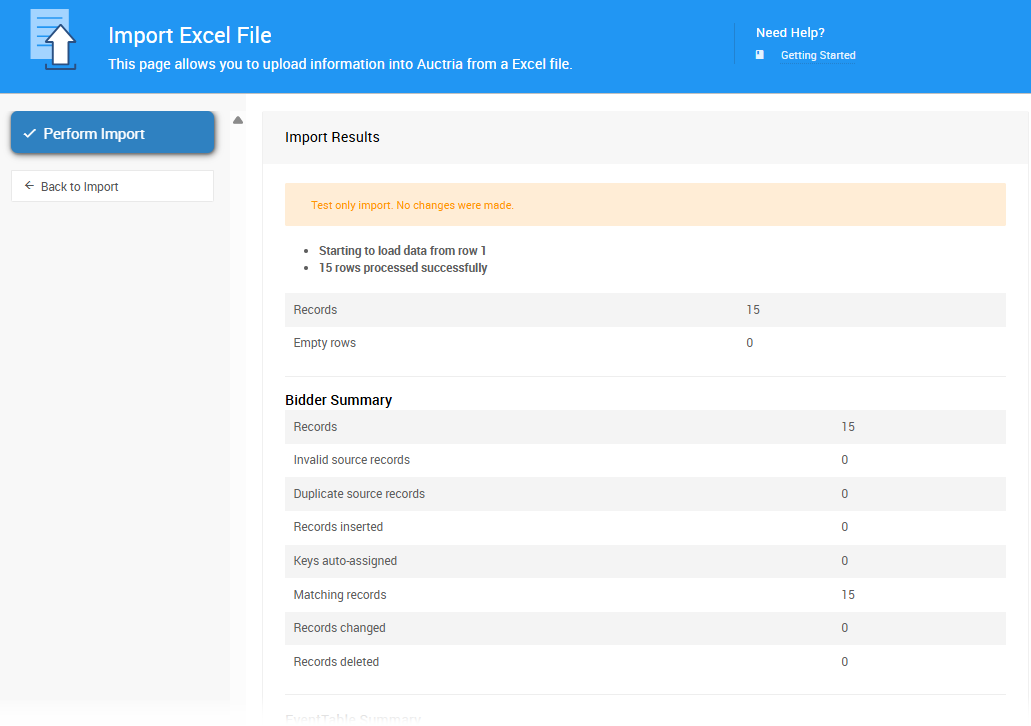
An example from a demonstration event.
Test Import
It's a great idea to run a test import first!
Check the test import results. If changes are necessary, click Back to Import. If the test import looks good, proceed with the actual import.
Step 5: Complete the Import
- Click Perform Import to execute the actual import
- Review the Import Results page showing the outcome of your import
When the import is done, a results summary will appear.
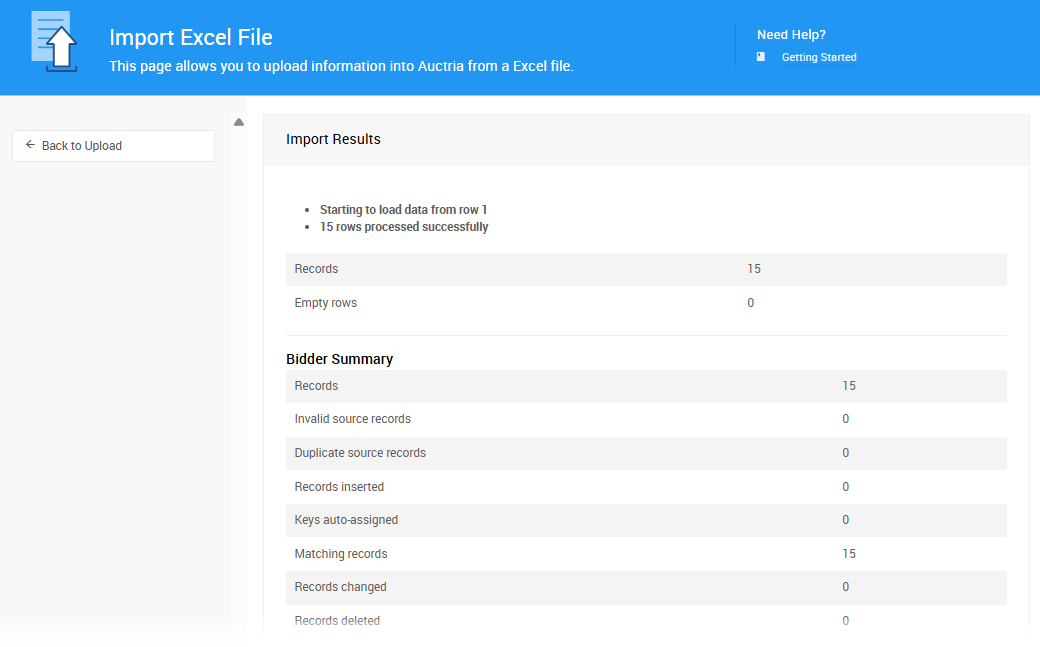
An example from a demonstration event.
Allow Inserts and Allow Modifications
Advanced Feature
The Allow Inserts and Allow Modifications checkboxes tell the system what to do if it finds a record in the Excel file you're uploading that already exists or does not exist.
When importing records into a table, the program will attempt to line up existing records with the rows in the Excel file. It does this by matching the key/primary field in the table with each row.
Key Fields by Table
| Table | Key Field |
|---|---|
| Participant | Paddle# |
| Item | Item# |
| Item Donor | Name |
| Item Category | Name |
How Matching Works
For example, if you are importing item records and you have a row with the value 123 in a column you mapped to Item#, and if Item# 123 exists, the platform will match these two.
- If Allow Modifications is checked, the values of the other fields will be written into the existing item
- If you do not check this option, no action will be taken for a matching record
- If Allow Inserts is checked and Item#
123does not already exist, it will be added as a new item
Modifying Data by Import
Advanced Feature
It is possible to modify existing data in Auctria by importing an Excel file with the key field for the table mapped.
When you import participants from an Excel file, if your spreadsheet has a Paddle# column and you map that column to the Paddle# field, the system will look for a matching Paddle# for each row.
- If there is a matching participant in the system, this participant will be modified with the information from the other mapped columns in the spreadsheet rather than being added as a new participant
- If the Paddle# is blank or the Paddle# does not exist in the system, a new participant record will be created
Existing Winning Bids and Payments
When importing into the WinningBid or Payment tables, it is not possible to modify existing records.
After Your Import
Once your import is complete, verify your data by navigating to the relevant table (e.g., All Participants, All Items) to view your newly imported records.
Export Data
You can export the following data from Auctria to an Excel file:
- Item Details
- Item Activity (bid, purchase, and donation information)
- Participant Details
- Participant Activity (bid, purchase, donation, and payment information)
- Donor Details
- Expense Details
How to Export Data
- Click Export on the left sidebar under Explore
- The Export Data window will appear with buttons for each export type
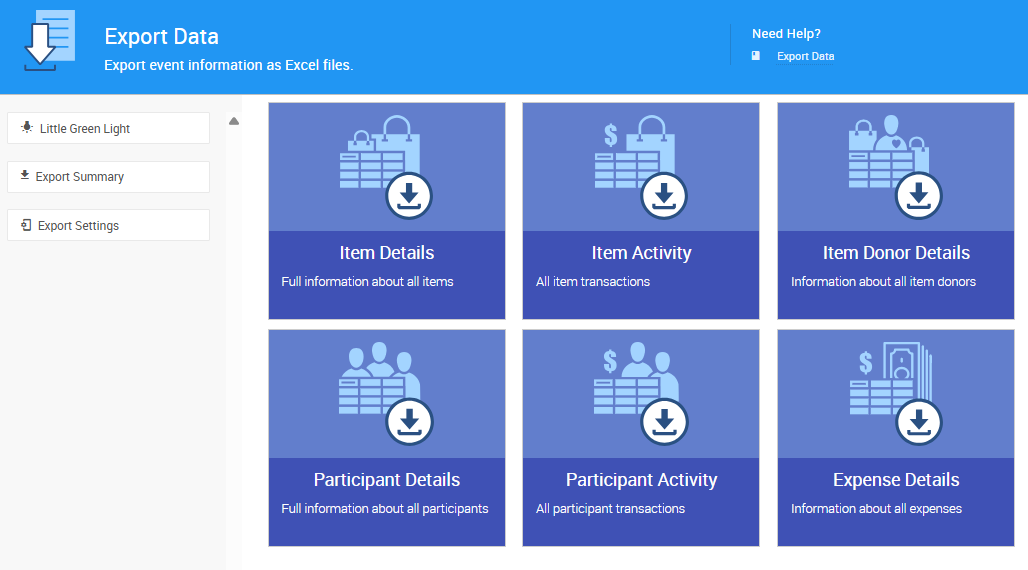
An example from a demonstration event.
- Click the appropriate button for the data you want to export
- You will be prompted to save the XLS file
Modify Export Settings
To adjust the settings for your data export:
- Click Export Settings on the left of the Export page
- The Export Settings window will appear
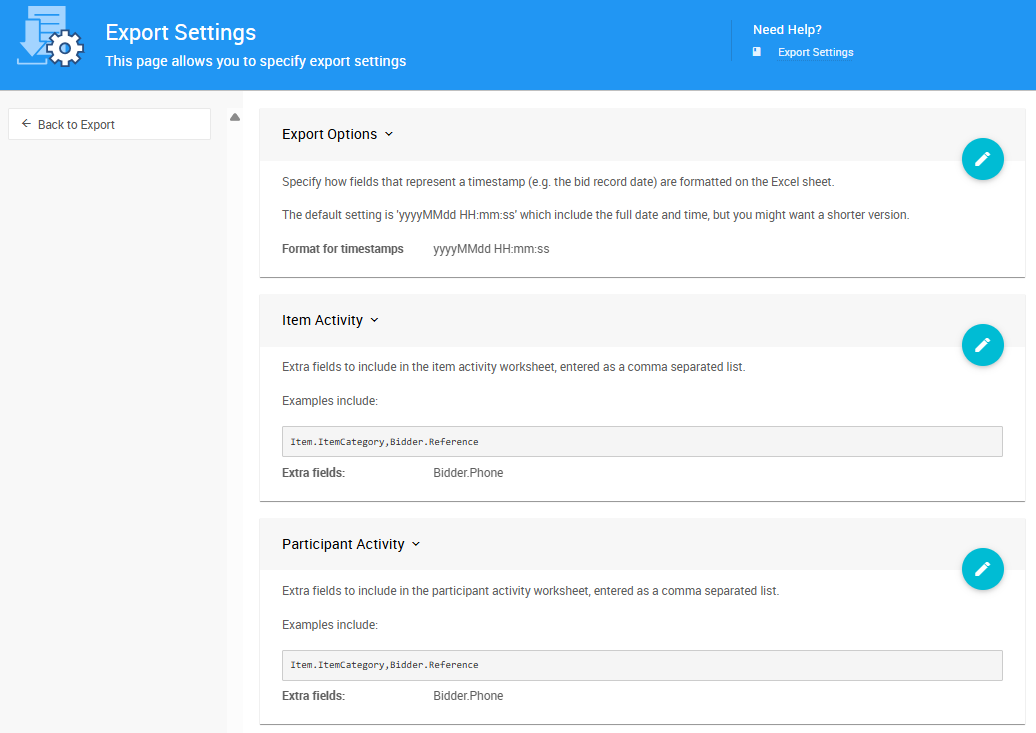
An example from a demonstration event.
- To edit a section, click the Edit icon (pencil)
- To save changes, click the Save icon (check mark)
- To undo changes, click the undo icon (arrow)
Additional Resources
For detailed information about available fields for each table, see:
- Map Fields for Import - Simplified list of table fields
- Filter Reference - (Advanced!) Comprehensive documentation of database schemas
If you encounter any issues during import, the test import feature will help identify problems before you commit changes to your database.